Archive | August, 2012

The DIY Life: Mason Jar Storage and Organization

29 Aug

If you’ve been reading this blog since it started or just browsed it for the last 5 minutes, or know me personally,  it’s pretty easy to see that I have an obsession with all things mason jars. I just can’t help myself! BUT it’s not like I need an intervention or will show up on an episode of hoarders any time in the near future. I hope not anyway. There is no other item that you can have in your home that has SO MANY USES! I use mine for the obvious reason they were created – for food preservation. But I use them for a multitude of other things. The older jars I use for things like foaming hand soap dispensers or homemade sugar scrub storage. The antique blue ones are used for storing sugar, splenda and ground coffee beside the coffee maker. I also use them on my shelving rack to store pasta, beans, and corn for popping. A big jar holds baking mix. Inside my cabinets, they hold all of my baking items: sugars, flours, grains, chocolate chips, nuts, baking soda, homemade vanilla extract, rice and other grains, homemade taco seasoning, dehydrated herbs. They are our drinking glasses for everything from beer to wine. Small portions of leftovers get nestled into them so they can easily be reheated for lunches the next day. Our freezer contains (freezer safe)  jars full of yumminess like pesto , squash spread, and creamy limoncello/tangicello. I have a light fixture by the sink that has old mason jars with stars on them as the glass over the bulbs.

I did this consolidation a couple of years ago because I was tired of all the boxes, bags and various containers holding all of our foodstuffs – raw material and ready to eat. I was so over going to grab the box of rice or pasta for a meal only to find there wasn’t enough. With the limited cupboard space we currently have, it was well overdue to start getting down to organizing everything. And not just the boxes. Because let’s face it – those box/bottle/bag laden shelves only stayed nice and organized for roughly 1 week after all that work. Being in a hurry to get dinner on the table meant things just got shoved back in where they fit. The canning jars saved the day! I’m not stuck on using only canning jars. The clear glass jars from Target are large enough to hold a 5lb bag of flour or sugar. Bigger barrel jars from the discount stores hold bulk egg noodles. A large apothecary jar holds homemade oatmeal.

The beauty of this type of organization is that it’s very easy to see how much of an item you have. There’s no guesswork if you have enough rice on hand for dinner that night. You’ll know if you need more flour for weekend bread baking just by looking into the cabinet. Because the jars are uniformly sized, there will always be a niche in your cabinet to put the jar you were using back where you found it, making it easier to keep your pantry organized.

I have a label on top of each lid that tells me what the jar contains. I will cut the directions off of the bag or box for items I’m not confident I’ll remember how to make and stick them inside the jar. Jars that contain items I don’t use weekly will have an additional label with the expiration date or I’ll cut that off the box/bag and tape it to the interior lid.

Always remember to use the items up before refilling – oldest out first. What I sometimes do is transfer the older contents to a smaller jar and put it on top of the bigger jar so I know to use up the small jar first and can get rid of those bags and boxes before they have chance to clutter up anything. This system has worked out so wonderfully for me. Christmas baking has become so much more efficient with everything so easily seen. People ask me how I don’t freak out about the jars sitting out because they are so easily seen and can get dusty. It’s simple – when I go to use the contents of that jar, I wipe it down with a wet dishcloth. The jars that sit out are the ones that I use pretty regularly so the odds of them getting visibly dusty are slim. They become part of the kitchen decor, but they serve a purpose.

How do you use mason jars in your home?

Grilled Romaine Salad with Grilled Buttery Garlic Baguette

27 Aug

Too much of anything for me ends with me getting sick of said thing. With certain exceptions: bread, eggs, and salad. We have salad with every meal. On those rare occasions when I am out of salad stuff, it feels like there is this huge void because there is no salad. Dinner is a downer, no matter how wonderful when salad is missing. Ok, not REALLY a downer, but still. A critical piece of the meal is missing.

With the summer days having been so very hot and the hubs on a mission to lose weight, he had started requesting just a big salad for dinner. Well, sweet. I can lose weight too AND save oodles of time on dinner prep by tossing together a salad! Woo hoo!!!

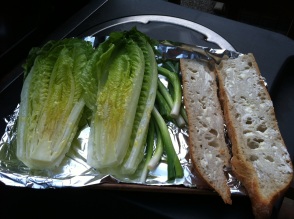
So, one day I found myself with some beefy romaine lettuce heads. Hmmm…seeing as how this is not my most favorite type of lettuce, I decided to help make it more palatable to me, I’d get wild and grill it. Grilling salad is no new thing, but I think we tend to forget about this option when prepping our meals. We put everything else on the grill, why not our salad too? Now, the thought of eating a grilled iceberg lettuce or grilled field green salad sounds rather gross to me. But romaine is nice and sturdy. It can handle the heat. That char that some of the leafy tops get just adds a lovely depth of flavor.

Now, since this is a grilled salad, meaning it will be warm when served, I wanted any additional ingredients to also be grilled and warm. So I grilled up the green onions. I even cut a couple of tomatoes in half and grilled them too. And the bread, oh the bread. Grilled to perfection with a lovely hint of garlic. I could eat a whole baguette of this stuff by myself. As it stands, I ate 1/4 of a baguette and forced myself from going back.

This recipe can easily be double, tripled, quadrupled to serve multiple dinner guests. The recipe below is enough to serve 2 as a side salad, or 1 as a dinner salad. I have already asked hubs to keep a path cleared to the grill when it starts to snow because this has rather quickly become my new favorite salad. I use my Creamy Italian Dressing with it, but you can use whatever you like. I wouldn’t go for any soft cheeses though as they will get melted and stuck together from the warmth of the salad. Harder cheeses are key. As is simplicity, which is why there are so few ingredients. Sometimes it’s nice to have a dinner that you don’t have to think too hard about or do tons of prep work. Enjoy!

Grilled Romaine Salad with Grilled Buttery Garlic Baguette

Serves 2 as a side, 1 as a main

1 head romaine lettuce, rinsed dried and sliced in half lengthwise

6 green onions, roots and green tops trimmed

1 clove garlic, cut in half

1/2 loaf baguette bread, cut in half lengthwise

shaved parmesan cheese for sprinkling

butter

olive oil

kosher salt

Preheat your grill so the grill plates are nice and hot. While the grill is heating up, drizzle olive oil over your green onions and romaine lettuce halves. Sprinkle with kosher salt.

Take the garlic clove halves and rub them all over both pieces of the baguette, tops and bottoms. Smear a little butter on the tops of each baguette half and sprinkle with some kosher salt.

Place your lettuce and bread halves cut side down on the hot grill along with your green onions. Let cook about 5 minutes or until the lettuce starts to get nice and browned and flip both the lettuce and the bread. Check your onions, once grill marks appear and onions start to get soft, flip them. Cook for about 5 more minutes. Remove everything from the grill.

Transfer the lettuce and green onions to a cutting board, and using a sharp knife, roughly chop everything into bite size pieces. Place in a bowl, sprinkling top of salad with shaved parmesan. Add dressing and toss to coat.

Serve with the grilled baguette and enjoy!

Pinterest Idea: Sock/Ballerina Bun

20 Aug

I won’t lie. When it comes to doing anything with my hair I am utterly, totally lazy. My hair is poker straight. Therefore my hair routine is that I wash it roughly twice per week (more if I happen to get dirty, sweaty, or have been swimming). In the summer I let it air dry a lot to help keep it moist. I will use a flat-iron only to smooth out any frizziness. That’s it. My products consist of shampoo, conditioner, and a little Argan oil to keep it moist and shiny. That’s it. But, it’s been hot out this summer. Hot as the fires of hell. Days where it feels like I could put dinner in the car while I’m at work and when I get home it’ll be cooked like I had it in the crock pot. Ya, it’s that bad. And my car does not have A/C. Sigh. So, I was looking for an alternative to my usual hot weather hair style of the pony tail or the sloppily looped through a hair tie style. I had pinned how to make a sock bun insert to give your less than huge bun some oomph. So, I sacrificed a brown sock and a tan knee-high and my bun booster was born.

You then put your hair into a high pony tail (we were going for a ballerina bun type style here) – put your ponytail through the center of the sock bun, then wrap your hair around it, tucking the ends in as you go and securing the whole thing with bobby pins.

Verdict? The style is super cute and easy once you get the hang of getting your hair wrapped and tucked. However, between the weight of my hair and the additional weight of the sock bun, my scalp was sore. SO, I think that going forward I’ll be sporting the sock bun at the back of my head, nearer to the base of my neck. It’s an easy before work hair style, as well as a nice change from my usual straight down ‘do.

The DIY Life: The perils of keeping chickens and the joys of those first eggs

16 Aug

It seems like forever ago that I talked the hubs into getting chickens. I can still remember him getting home with those 2 little boxes that basically looked like happy meal containers and opening them to see those little Mallard ducklings and the Golden Laced Wyandotte chicks. I was in love with their fuzziness and adorable little chirping sounds. Two weeks later we got 6 Barred Plymouth Rock chicks. I remember relocating them to the garage so that they had more room to roam and not be on top of each other. I remember how quickly they seemed to grow after that relocation and how fast it started to stink since the ducks liked to play in their water, making the litter wet and requiring it to be changed at LEAST every other day. I remember the coop getting finished enough for them to move in. Now, all these months later, it seems normal to go out daily and check their food and water supply. To hunch down and give them a quick pet on their backs. To hear Thor crowing throughout the day. To wake up early on a Saturday and Sunday to let them out of the coop into their fenced in run. Now they are trained to come running back to the coop if they are out free ranging and I need to leave by the simple shaking of a solo cup full of scratch grains or cracked corn. The only thing left to make all of these efforts worthwhile is to see the beauty of a freshly laid egg somewhere in the coop. A week ago today, I came home from work and went to check the food and water and to let the birds out to free range and immediately noticed a hen with a bulging, blood and poop stained sack hanging off her back side. I quickly let out all the other birds and kept her in the run so she was safe. All I could think to myself was oh no. I did not sign on for THIS. I should not have to deal with THIS! But deal with this I would have to. I had to try to save this wounded Wyandotte. Turns out she had suffered what is called a prolapse – this is where her insides end up outside. Sometimes it happens in early layers, or on the first egg laying, or older birds. There are no fast or hard rules, and it’s not something you can predict. For the most part it’s simply segregating the hen, cleaning her up, swabbing her prolapse with some preparation h and pushing it all back in, keeping her isolated until everything looks normal again. For this hen, it would not be that simple. See, chickens can be mean, cannibalistic creatures. The reason for all the blood? The other hens had pecked at her. It’s what they do when they see sickness of any sort. So while I rounded up an old dog crate and got it clean and filled it with soft new pine shaving to get her segregated, the hen laid an egg followed by a yolk.

Egg and yolk laid by our Wyandotte who had a prolapse

The huge bulge on her back side got instantly smaller. I thought yay! Now I just clean her up and it’s all good. Nope. Once hubs got home, I got the wounded hen out of the coop and took her into the house. Hubs wrapped her head and wings in a towel (this calms the hen) and I donned some gloves and got to work cleaning her up. It was awful looking. I had to be gentle because I wanted to cause the hen the least amount of discomfort. I got her as cleaned up as I could. Hubs had to attempt to push the prolapse in because I was at risk of passing out. (I’m not good with blood. At all. Human or animal. It blows) I was fine up until I got her cleaned up enough to apply the preparation h ointment. As soon as I saw blood on my glove, I was done. Sheesh. Can’t help it. That’s how I roll. Anyways, we got as much of the prolapse pushed back in as possible, gently put her in the dog crate with some water, draped a towel over the top and sides of the crate leaving only the front open and turned out the light. We gave her just enough food to keep her alive because you don’t want to take the risk of them laying another egg so soon after a prolapse. So minimal light, only about 3hrs per day, and small amounts of food mixed with yogurt. Two days later? I found another egg. BUT it was clean, no blood, and didn’t appear to cause any additional damage. So, the good news is that everything seems to still be working. For the past week, my morning consist of waking up and tending to my wounded Wyandotte. Cleaning her bum up, spritzing her with some iodine solution, and drying her as good as I can without making her uncomfortable. I had to cut out some of her feathers because even with daily cleanings, they were caked with chicken poop, and chicken poop is like GLUE. You have to SCRUB at it to get it off. The portion of the prolapse that was sticking out fell off last night! So our patient seems to be feeling much better. She is back to grooming herself again and she is certainly enjoying her yogurt and feed mush that I’ve been making for her. I am going to put a pen up for her to stretch out her legs and get some exercise, but still keep her segregated until at least Sunday. I don’t know how her insides are looking so I want to give her a couple more days to heal before rejoining her flock. I’m hoping that in the future, all of her eggs come out without causing her any harm. If she could lay an egg without wrecking herself again while she was in segregation, I feel hopeful she’ll be ok in the future. I would be very sad if she went through all this rehabilitation just to be wounded again the next time.

Our FIRST egg, from our wounded Wyandotte

Some more good news – it seems our other Wyandottes are laying as well! And with  no issues! Hubs never did get around to partitioning off the nesting boxes, so the ladies created their own niche for eggs in the corner. So far the ladies have given me under a dozen eggs in a few days. They are small (in the photo below the brown one is our hens eggs, the right white one an XL store-bought), but they are still figuring things out and will lay larger eggs soon. When I put the birds to bed a few nights ago I decided I wanted to see how much they moved the fresh pine shavings around since I am doing the deep litter method. Thor nests into one corner of the nesting box, our mallards in the other. And in the corner I spied those brown eggs and ran into the house like a kid who just spotted Santa for the keys to open the back of the coop and get to them.

Overall I’m happy with my choice to keep chickens (and ducks!). Their litter and droppings will provide nutrient rich soil once composted for our garden. Their eggs will keep us well fed as a food source WE control. Their antics will provide endless entertainment. And they’ll help control the bug population at our house by feasting on them in their free range time.


Recipe Test: Joy the Baker’s Strawberry Upside Down Cake

13 Aug

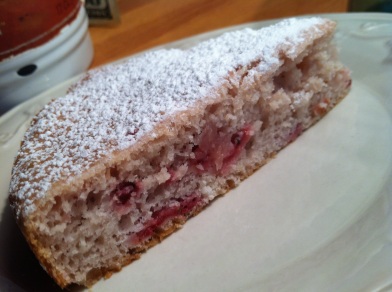
I love Joy. From her wittiness in her posts to her down to earth recipes with a little twist. When I saw her post a recipe for a Strawberry Upside Down Cake, well I was just smitten. And HAD to make it ASAP. So I did. It was FANTASTIC. Really. I followed her recipe with the exception that I did not use any Cardomom, because I didn’t have any to use. I increased the amount of vanilla in mine from 1 teaspoon to 2 teaspoons. Also, I increased the brown sugar from 1/4 cup to 1/2 cup for the topping. It turned out wonderfully. Took it to a cookout and shared it with family and friends. They very much enjoyed it. It was very easy to make and took only a small amount of time to whip up.

I’m noticing an obsessive pattern here with me and strawberries lately. I can’t help it! Every sweet treat I make has these ruby red beauties and the fruit portion. I may need an intervention.

These photos below were taken just after it was freshly popped out of the pan. The strawberries didn’t stay that bright red. Once they are exposed to the air and cool down they turn from bright red to a dark shade of mauve. Don’t worry. This happens with all recipes that cook strawberries. They can’t keep that brightness once all the juices soak into the cake. So don’t worry if yours goes from BLAM! Bright Red to Meh Mauve. It will still taste fantastic. I promise.

Get the recipe HERE, straight from Joy. Drool over my pictures. Ya. That’s right. You know you want a piece of this cake. I sure want another one.

Hope & a Strawberry ShortCake PanCake

8 Aug

Heidi, a fellow blogger over at Lightly Crunchy, has tagged me in a blog relay to write about the subject of hope. What better time to write about it than now?

What better place to start than with the definition of hope?

hope/hōp/

Noun:
A feeling of expectation and desire for a certain thing to happen.

* I hope that my garden does well because I am so looking forward to using my pressure canner to can pasta sauce for the first time (now that I’ve gotten over my fear of it exploding, covering myself and every kitchen surface in molten hot food lava)

* I hope my chickens start laying some eggs soon, because buying them from the store is for the birds. badum-bum. I’ll be here all night.

* I hope that I am able to find the motivation to get myself back into the swing of exercising so that I can lose that 10lbs of fat from overindulging in homemade beer. Whoops.

* I hope that the hubs and I can take a long weekend soon just to kick back and relax and not worry about having to DO anything!

* I hope that my dad being home on the one year anniversary of my mom’s passing helps to make it a less heart wrenching experience.

* I hope that my blog inspires other to cook, craft, and make as many things from scratch as they can.

I think that hope means different things to different people. That having hope makes you feel a little less lost out in this great big crazy world. That hope brings people together, just like food does.

I hope that you enjoy this Seasoned with Sarcasm original as much as I do.

Strawberry ShortCake PanCake

serves 6

1 box white cake mix

2 cups frozen strawberries, chopped (do NOT drain the juices from them) *see note

1 egg

1 1/2 cups water

1 tablespoon vanilla

powdered sugar for dusting

Preheat oven to 350 degrees. Grease 2 9 inch round cake pans. In a medium bowl, add cake mix, strawberries & juices, egg, water & vanilla and mix until no large lumps of cake mix remain. Split the batter between the two cake pans and bake for 30-35 minutes, or until a toothpick pierced in the center comes out clean. Let cool to room temp and dust with powdered sugar. Serve with whipped cream or ice cream, or all by itself.

Note: If you are using fresh berries, chop them up and then place them in a bowl with a teaspoon of sugar. Let them sit for 15-30 minutes until you see them getting nice and juicy. You don’t want to skip the strawberry juice portion because it gives the cake a really nice well-rounded strawberry flavor and helps with the moisture. If using frozen berries, chop them up and make sure they are totally thawed. Once you chop them up and let them defrost there will a nice juicy puddle in with them.

And now it’s my turn to pass the torch to 3 fellow bloggers.

The Food and Wine Hedonist – because his posts are witty, funny, and down to earth.

Bonnie, over at Recipes Happen – she’s a new wife finding her way around the kitchen getting creative and crafty, willing to try new things.

Emily, also known as Yinzerella over at Dinner is Served 1972 – I love her wit, sarcasm, and the fact that she is on a mission to work and eat her way through all the DiS recipe cards. No matter how weird the recipes are!


The DIY Life: Chocolate Cherry Coconut Granola

6 Aug

Wow. That is a mouthful – Chocolate Cherry Coconut Granola. A mouthful that you want to eat again. And again. And AGAIN! I love granola. Especially in my yogurt. It’s filling, it’s healthy, it reminds me of being a kid. What I don’t like? The high price to purchase it at the grocery store. Blech. I also don’t like having big chunks of the stuff to eat. It makes me feel like a hog shoveling a huge hunk of yogurt covered granola into my face in public. Plus, let’s face it. Your flavor options are limited when it comes to what’s out there. So I decided to concoct my own recipe. This yields a lot of granola, so feel free to cut the recipe in half if you don’t think you will eat it all. My recommendation is to make the whole batch and share it. I gave some to a couple of friends so they could try out the fabulousness that is this recipe. I think this will quickly become one of my favorites when whipping up a batch of granola.

If you are fan of the chunks of granola clustered together, double the amount of oil in the recipe. Don’t have coconut oil on hand? Substitute olive oil, sunflower oil, whatever your heart desires. I chose coconut because it’s good for you and I have a tub on hand. Please just don’t use canola or vegetable oil. Are you a total chocoholic? I find the chocolate flavor of this to be just right for me with the combo of the cocoa powder and dark chocolate almonds, but if you want it REALLY chocolate laden then add another tablespoon of cocoa powder. I wanted the other ingredients to be able to be tasted so I only used 1 tablespoon. It’s totally adaptable!

And since you’ve gone to the trouble of making your own granola, why not make your own Vanilla Bean Yogurt to eat up with it? Mhmmm.

Chocolate Cherry Coconut Granola

4 cups quick cooking oats

2 cups brown sugar

1/2 cup coconut oil

1-2 cups unsweetened organic coconut flakes (depending on how much you like coconut)

1 tablespoon cocoa powder

1 teaspoon kosher salt

1 5oz bag cherry craisins

2 1/2 cups Blue Diamond dark chocolate almonds, pulsed a couple times in the food processor

Preheat your oven to 250 degrees. Line a rimmed baking sheet with parchment paper or a silpat mat. In a large bowl, add your oats, brown sugar, coconut, coconut oil, salt and cocoa powder. Stir to combine and no lumps remain. Pour your mixture onto your prepped baking sheet and place in your preheated oven. Bake for 1 hour, stirring oat mixture about every 15 minutes.

Remove the pan from the oven and let cool for about 15 minutes. Add mixture to a large bowl, then add almonds and cherry craisins. Stir to combine.

Once mixture has completely cooled, store in mason jars or other air tight containers and enjoy! Stored this way it should last you awhile. Exactly how long I have no idea because it doesn’t last long enough to go stale. This is fantastic on my Vanilla Bean Yogurt. I had a friend who enjoyed it on some vanilla bean ice cream as well. Or, you can just eat it straight out of the container. Whatever your heart desires!